How to use the Microsoft Graph API to consume data stored in a protected SharePoint List in xMart
Linking the MS graph API to XMART requires two major steps:
- Acquiring a token through which XMART will access MS Sharepoint/OneDrive
- Identifying the link through which a spreadsheet/table can be accessed
Important to note is:
- The acquired token is specific to a user’s account, and will fail when that user’s password changes – a new token has to be acquired at this point
- The token is universally applicable to all Sharepoint/OneDrive documents that the user has access to.
- Admin rights are required to obtain a token
Acquiring a token
- Download the file getToken.ps1 and save to a location that can be easily accessed
- Open Microsoft POWERSHELL as administrator
- Type the following commands (note that you can drag the file into POWERSHELL to get its file address)
Set-ExecutionPolicy -ExecutionPolicy RemoteSigned -Scope CurrentUser
Unblock-File <<Insert the file address of getToken.ps1, in double quotes>>
- Open another instance of powershell (not as administrator)
- Type the following command:
<< Insert the file address of getToken.ps1, no quotes>>
- Paste the url in the POWERSHELL into a web browser
- Paste the resulting url into POWERSHELL
- Obtain the resultant refresh token from POWERSHELL – paste this in the quotes in the generic refresh token provided (generic_refresh_token.txt)
- Navigate to xmart under Admin -> Connections
- Create a new WebService Bearer Token Connection: a. Press Client credentials b. Paste the refresh token in the text box provided c. Paste the following in the Token endpoint URL https://login.microsoftonline.com/worldhealthorg.onmicrosoft.com/oauth2/v2.0/token
- Save and name the new connection
Acquiring a specific excel file/table
Now that a token has been acquired, a url is needed to access a specific excel file and/or table/worksheet within the file. The general structure of a graph api url is:
https://graph.microsoft.com/v1.0/sites/sharepoint_id/drive/items/file_id/workbook/tables/Table2/range?$select=text
These need to be obtained separately as follows:
- Navigate to the sharepoint url of the file you wish to access via the graph api and append /_api/site to the url
https://worldhealthorg.sharepoint.com/sites/xxxx/_api/site
- Paste the resulting text into notepad++
- Use the find function to search for HubSiteId – the following ID is the sharepoint ID.
- Navigate to the Microsoft graph api expolorer: https://developer.microsoft.com/en-us/graph/graph-explorer
- In the query window paste the following url (under GET) where xxx is the sharepoint id previously obtained: a. https://graph.microsoft.com/v1.0/sites/xxx
- Under Modify permissions consent to all permissions
- Append the following to the URL and search (where xxx is a string to search for) /drive/root/search(q=’xxx’)?select=name,id,webUrl\
- Search, and look at the response preview. The file id will be shown under the name of the file
- In the xmart pipeline, use this structure:
    <GetWebService Url="https://graph.microsoft.com/v1.0/sites/sharepoint_id/drive/items/file_id/workbook/tables/Table2/range?$select=text" ConnectionName="connection_name">
      <GetJson OutputTableName="data">
        <PathHeader>$.text[0][*]</PathHeader>
        <Path>$.text[1:]</Path>
      </GetJson>
    </GetWebService>
You’re done!
Alternative method
Step 1: Generate ClientID and allow it to get your files
For convenience, you can now use this client_id: 99e547ef-258a-4db0-ad11-9466a3d1f4eb (WHO AD Sharepoint Reader app) if you don’t want to use a custom one.
📄 Official documentation: https://docs.microsoft.com/en-us/graph/auth-v2-service
In Azure Portal, register a new app with Native client authorization (it should have be allowed to request the scope:offline_access).
Retrieve its client id, we will refer to it as 99e547ef-258a-4db0-ad11-9466a3d1f4eb in the next steps.
https://portal.azure.com/#blade/Microsoft_AAD_IAM/ActiveDirectoryMenuBlade/RegisteredApps
In the API Permissions from the Azure AD portal menu, add a new permission: Microsoft Graph > Delegated Permissions > Sites.Real.All, Files.Read.All
Step 2: Retrieve the file info
📄 Official documentation: https://docs.microsoft.com/graph/api/list-get?view=graph-rest-1.0&tabs=http
The goal is to retrieve the list id LIST_ID and site id SITE_ID from the list you want to access.
Usually you can get those infos from the Graph Explorer.
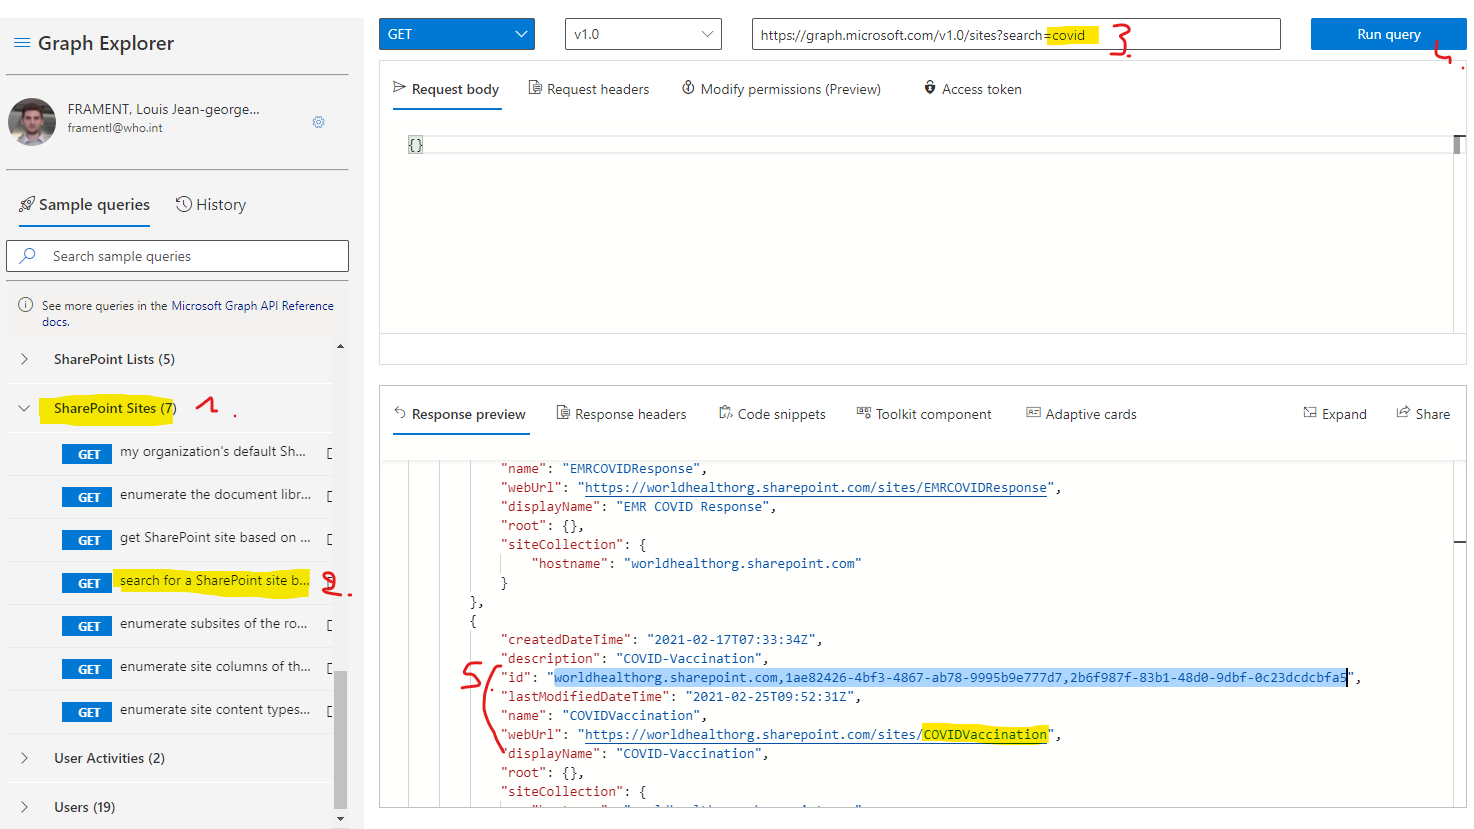
Use https://graph.microsoft.com/v1.0/sites?search=YOUR_SITE_NAME to find the id info from the JSON response.
- Connect with your WIMS account in the Graph Explorer and allow permissions as requests.
- Run the Sharepoint sites > search for a Sharepoint site query
It should look like this: worldhealthorg.sharepoint.com,xxxxxxx-xxxx-xxxx-xxxx-xxxxxxxxxx,xxxxxxx-xxxx-xxxx-xxxx-xxxxxxxxxx
Once your have this id aka SITE_ID, use https://graph.microsoft.com/v1.0/sites/${SITE_ID}/lists to fetch available lists.
Step 2: Set up the mart connection
Code popup helper way
If you don’t want to use the cliend_id 99e547ef-258a-4db0-ad11-9466a3d1f4eb, please follow the manual steps way below, else follow those steps:
- Click the Add button to create a new connection under the WebService Bearer provider (referred to “MySharepointConn” for this example)
- Make sure you are logged in with the account authorized on the target Sharepoint file.
- Click on
<button>Open the authorization_code helper popup</button>, and accept the permission to access your files request popup. - Update the “scope” JSON property as displayed (
"scope":"https://worldhealthorg.sharepoint.com/.default",).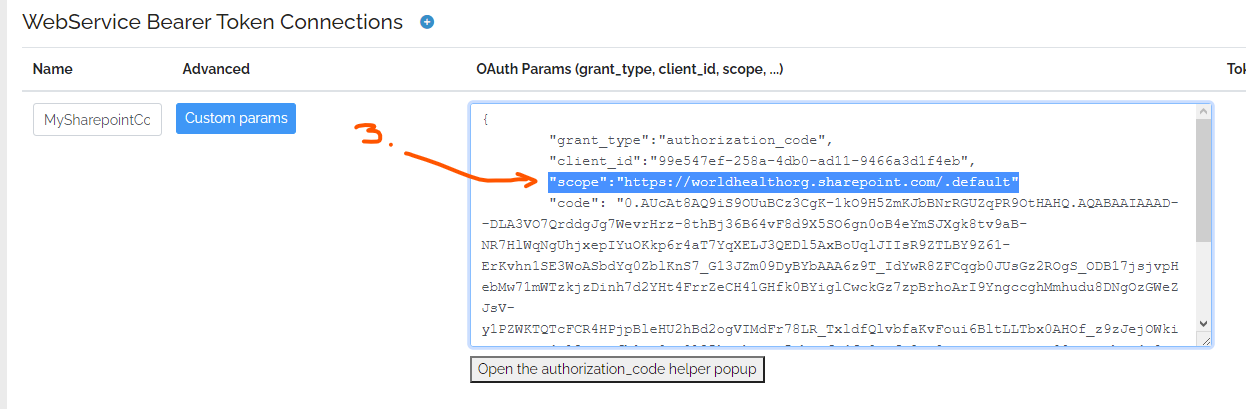
- Click on Current Azure AD button and set Token URL endpoint to
https://login.microsoftonline.com/f610c0b7-bd24-4b39-810b-3dc280afb590/oauth2/v2.0/token - Click Save button to save the connection.
Manual steps way
We’ll use the code flow using the native client process to get the authorization_code. This will be a one-time manual step.
Replace the 99e547ef-258a-4db0-ad11-9466a3d1f4eb with the one get from Step 1 in the following URL and open it from a browser
https://login.microsoftonline.com/f610c0b7-bd24-4b39-810b-3dc280afb590/oauth2/v2.0/authorize?client_id=99e547ef-258a-4db0-ad11-9466a3d1f4eb&response_type=code&redirect_uri=https://login.microsoftonline.com/common/oauth2/nativeclient&response_mode=query&state=12345&scope=offline_access%20Sites.Read.All%20Files.ReadWrite.All
You should get redirected to a blank page, but in the new URL, there is a code parameter to extract manually. Beware to not include some extra parameters at the end of the URL!

Once you get this code (referred as CODE_EXTRACTED_FROM_URL), in xMart, create a new WebService Bearer Token **connection:
Name: in this tutorial, we’ll referer to the connection as sharepoint_list
Click on the Client credentials switch to enter Custom params mode and input raw JSON:
{
  "grant_type":"authorization_code", "client_id":"99e547ef-258a-4db0-ad11-9466a3d1f4eb","scope":"offline_access Sites.Read.All Files.ReadWrite.All","redirect_uri":"https://login.microsoftonline.com/common/oauth2/nativeclient","code": "CODE_EXTRACTED_FROM_URL"}
The authorization_code is only valid once, that’s why we provide the scope:offline_access. It allows to retrieve a refresh_token, that is then stored by xMart.
Note: Once a refresh_token is retrieved from the Token Endpoint, the xMart connection is automatically updated to store the refresh_token and remove the used code so the connection will still be valid after the first request (usually the refresh_token is valid 6 months).
{"grant_type":"refresh_token", ..., "refresh_token":"OAQABAAAAAAAm-..." }
Step 3: Visualize your data in the Graph Explorer
GraphExplorer API response looks like:
Build the list URL like so https://graph.microsoft.com/v1.0/sites/${SITE_ID}/lists/${LIST_ID}/items?$expand=fields
{
    "@odata.context": "https://graph.microsoft.com/v1.0/$metadata#sites('worldhealthorg.sharepoint.com%2C1ae82426-4bf3-4867-ab78-9995b9e777d7%2C2b6f987f-83b1-48d0-9dbf-0c23dcdcbfa5')/lists('fcc84ce6-67b8-4748-97d2-db0b37966548')/items(fields())",
    "@odata.nextLink": "https://graph.microsoft.com/v1.0/sites/worldhealthorg.sharepoint.com,1ae82426-4bf3-4867-ab78-9995b9e777d7,2b6f987f-83b1-48d0-9dbf-0c23dcdcbfa5/lists/fcc84ce6-67b8-4748-97d2-db0b37966548/items?$expand=fields&$top=1&$skiptoken=UGFnZWQ9VFJVRSZwX0lEPTI1",
    "value": [
        {
            "@odata.etag": "\"b9373a8b-8aae-435f-b51c-e28a7a65044c,3\"",
            "createdDateTime": "2021-02-25T18:40:14Z",
            "eTag": "\"b9373a8b-8aae-435f-b51c-e28a7a65044c,3\"",
            "id": "25",
            "lastModifiedDateTime": "2021-03-04T06:39:33Z",
            "webUrl": "https://worldhealthorg.sharepoint.com/sites/COVIDVaccination/Lists/VaccineUptakeWeekly/25_.000",
            "createdBy": {
                "user": {
                    "email": "sharifuzzamanm@who.int",
                    "id": "19749da1-02a4-43ba-8885-7afcf30d4542",
                    "displayName": "SHARIFUZZAMAN, Md."
                }
            },
            "lastModifiedBy": {
                "user": {
                    "email": "sharifuzzamanm@who.int",
                    "id": "19749da1-02a4-43ba-8885-7afcf30d4542",
                    "displayName": "SHARIFUZZAMAN, Md."
                }
            },
            "parentReference": {
                "siteId": "worldhealthorg.sharepoint.com,1ae82426-4bf3-4867-ab78-9995b9e777d7,2b6f987f-83b1-48d0-9dbf-0c23dcdcbfa5"
            },
            "contentType": {
                "id": "0x0100812B6E7C9ABA194D95B4DEE34AC16CE9",
                "name": "Item"
            },
            "fields@odata.context": "https://graph.microsoft.com/v1.0/$metadata#sites('worldhealthorg.sharepoint.com%2C1ae82426-4bf3-4867-ab78-9995b9e777d7%2C2b6f987f-83b1-48d0-9dbf-0c23dcdcbfa5')/lists('fcc84ce6-67b8-4748-97d2-db0b37966548')/items('25')/fields/$entity",
            "fields": {
                "@odata.etag": "\"b9373a8b-8aae-435f-b51c-e28a7a65044c,3\"",
                "Title": "1|4",
                "NumberTargetGroup": 0.0,
                "Dose1": 736680.0,
                "Dose2": 0.0,
                "IsAggeration": false,
                "IsActive": true,
                "CountryLookupId": "1",
                "CountryWiseVaccineLookupId": "4",
                "WeekNoLookupId": "10",
                "CountryWiseVaccine_x003a_TitleLookupId": "4",
                "CountryWiseVaccine_x003a_IDLookupId": "4",
                "WeekNo_x003a_TitleLookupId": "10",
                "WeekNo_x003a_IDLookupId": "10",
                "Country_x003a_TitleLookupId": "1",
                "Country_x003a_IDLookupId": "1",
                "id": "25",
                "ContentType": "Item",
                "Modified": "2021-03-04T06:39:33Z",
                "Created": "2021-02-25T18:40:14Z",
                "AuthorLookupId": "44",
                "EditorLookupId": "44",
                "_UIVersionString": "1.0",
                "Attachments": false,
                "Edit": "",
                "LinkTitleNoMenu": "1|4",
                "LinkTitle": "1|4",
                "ItemChildCount": "0",
                "FolderChildCount": "0",
                "_ComplianceFlags": "",
                "_ComplianceTag": "",
                "_ComplianceTagWrittenTime": "",
                "_ComplianceTagUserId": ""
            }
        }
    ]
}
Step 4: Edit xMart pipeline
Create or edit your pipeline https://extranet.who.int/xmart4/YOUR_MART/pipelines/PIPELINE_CODE
We can define some origin values to store the multiple parameters in the pipeline Context section.
<XmartPipeline>
  <Context>
    <Inputs>
      <Add Key="SITE_ID" Type="text"/>
      <Add Key="LIST_ID" Type="text" />
      </Inputs>
    <OriginValues>
      <Origin Code="EXCEL_ONLINE">
        <Add Key="SITE_ID" Value="TO_RETRIEVE_FROM_STEP_2" />
        <Add Key="LIST_ID" Value="TO_RETRIEVE_FROM_STEP_2" />
      </Origin>
    </OriginValues>
  </Context>
The API response looks a bit like OData, but the values are not stored in the standard location (usually value property).
The GetJson command will be used to specify the expected format.
The list values are stored in the expanded fields property of each value.
</Context>
<Extract>
<GetWebService Url="https://graph.microsoft.com/v1.0/sites/${SITE_ID}/lists/${LIST_ID}/items?$expand=fields&$top=10000" ConnectionName="sharepoint_list">
<GetJson OutputTableName="data">
<Path>$.value[*].fields</Path>
</GetJson>
</GetWebService>
</Extract>
<Load>
In the Url attribute, the & characters should be xml-escaped by using & instead, else a parse error like '=' is an unexpected token. The expected token is ';' will be thrown.
Use the debugger to visualize the loaded data, then finish your pipeline by loading stage table data in your target table using the regular <LoadTable SourceTable="data" TargetTable="...">.
The $top parameter is to make sure Sharepoint does not return only the first 200 rows of the list, using a Odata.nextLink that is not supported by GetWebService.
You’re done!