Custom Forms
Like Standard Forms, custom forms target a single storage table, but aspects such as which fields appear on the form and the sequence of fields can be customized. It is also possible to customize form field labels, display read-only fields, set default values, conditionally hide fields, filter items in foreign key dropdowns, add validation expressions (beyond the rules defined by the data model, which are always enforced) and group fields.
This article tells you how to create and edit them.
Using Custom Forms
Accessing Custom Forms
Custom forms appear under a new top-level menu item called Forms.
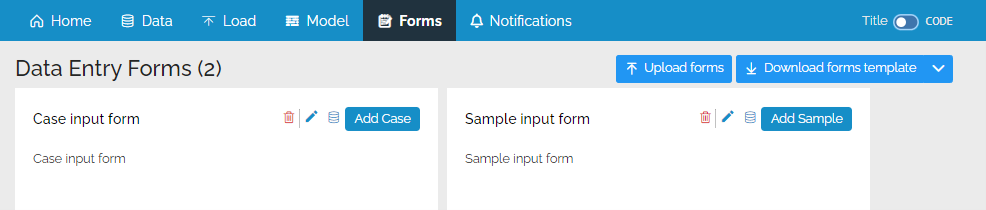
Visibility of the Forms menu item requires either the FORM_MANAGE permission (to create and manage forms) or FORM_DATA_ENTRY permission (to use one or more forms).
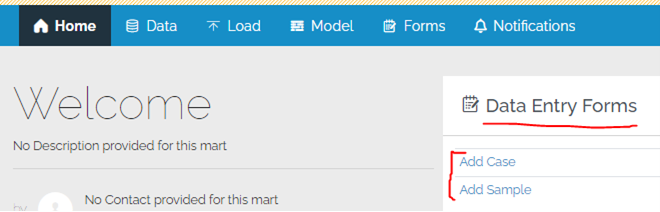
The mart’s home page also lists the forms the user has permission to use:
“i” Icons
Clicking the “i” information icon above any field reveals details about the field such as the underlying table field code, description and data type. Clicking the “i” icon at the top of the form will reveal this information for all fields.
![]()
Record Check
When creating a new record with a form, the user is first prompted to enter the business primary keys of the record before filling out the entirety of the form. This iso that a record check is performed to see if an existing record with matching business primary keys exists.
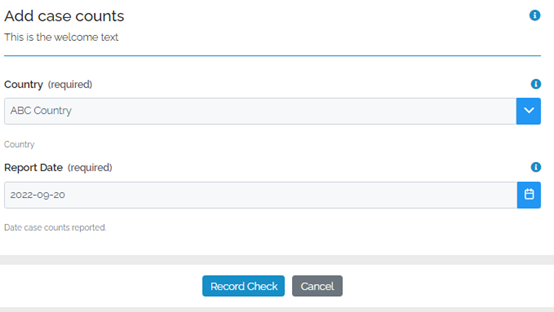
If a matching record exists, it is retrieved and the form switches to updating the retrieved record (rather than creating a new record). This facilitates editing existing records and to prevent the creation of duplicates before the entire form is filled in. A record check is also performed after the Save button is pressed, in case the user changed the business primary keys while editing the entirety of the form and inadvertently created a duplicate. It is also possible to mark business primary keys as read-only in the form definition. In this case, business primary keys can be entered at the time of the record check but become read-only if an existing record is found. After filling out the form, the user can either just Save, or Save and Add New Record (this button text is configurable and also this button can be hidden).
Save Buttons and Behavior

If the user presses Save, the user is returned to a view of their data with their most recent edit at the top.
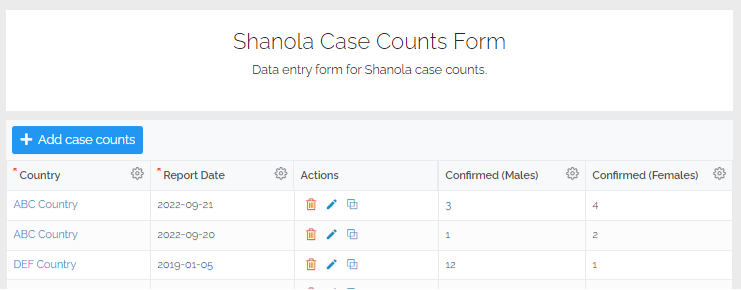
This view of the data matches the structure of the form - the columns and their sequence correspond to the form. This facilitates a quality check of the data after submitting and also the ability to quickly view or edit past data records. Access to this form-specific view of data is also available from the Forms page.
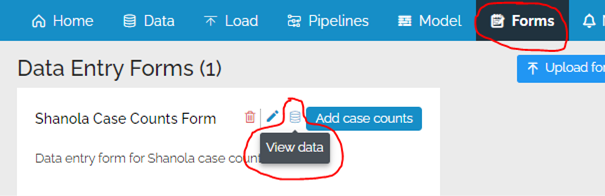
Therefore, data entry users might not have access to the Data page but can nevertheless see the data they submitted via the Forms page.
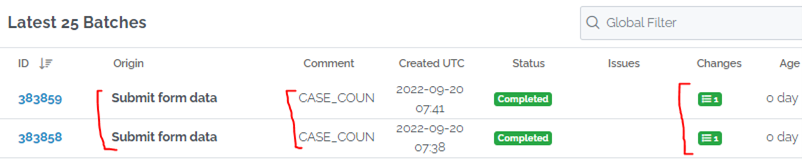
Batches Created Behind the Scenes
Behind the scenes, pressing a Save button results in the creation and committing of 1 new batch consisting of 1 record, visible on the load menu. The origin title is “Submit form data” (code = SYS_FORM_DATA_ENTRY) and the code of the target table is added to the batch comment.
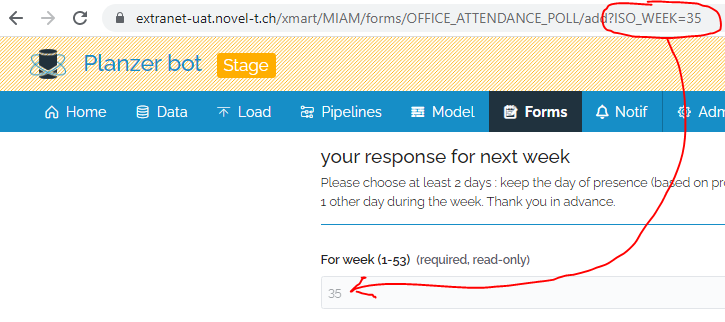
Pre-filled Fields With URL Parameters
URL parameters can be used to pre-fill form field values. Use the field code for the URL parameter name and set it equal to the desired value as shown below.
Create and Edit Custom Forms
Basic Info
There are 2 ways to create and edit a form:
Regardless of which method is chosen, every custom form is bound to an existing table to receive the form data (the “target” or “storage” table). A single table can have many custom forms. This facilitates customization of the form for different audiences (ie forms in different languages or forms with different field subsets depending upon the dat entry role/responsibility).
Every field on a custom form corresponds to a field in the storage table. By default, custom forms inherit the properties of the table they are attached to. This includes properties such as field labels, description and sequence which can optionally be overridden in the form. This also includes model validation rules such as “is required”, data types and text lengths. Model validation rules cannot be overridden in the form (but additional rules can be added).
TIP: it is best to avoid customizing fields in forms and instead make changes in the storage table itself so that changes automatically apply to all forms for the storage table. For example, to improve a form field description, consider improving the underlying table field description and not specifying a form field description.
If a table does not yet exist, it must be created. This can be done in a number of ways
- from existing data
- manually from an Excel file
- manually from the front end.
- extracting the table layout using a query from a SQL Server database.
Create/Edit Forms - Design mode
Create a new form
On the Forms page, click the “Create form” button

Fill out the small metadata form and press “Generate form”.
Open a form in design mode
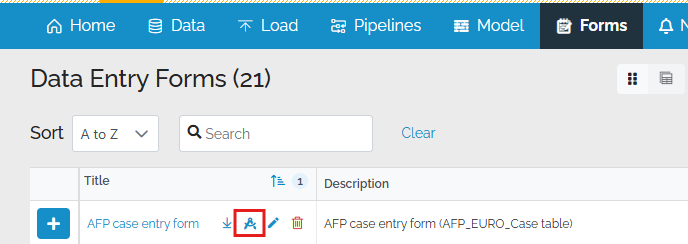
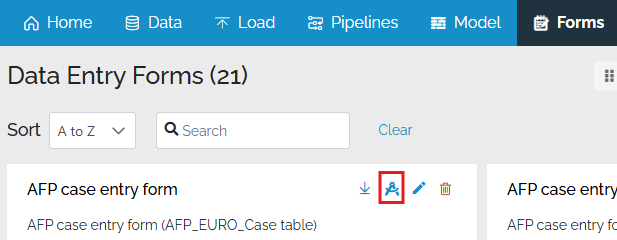
To open an existing form in design mode, go to the Forms page and either press the compass button in Tables view mode or in Cards view mode.
Tables view:
Cards view:
Switch to design mode while testing
While testing a form, in other words, while you are filling out a form, you can switch to design mode by pressing the gear icon and selecting “Toggle form design mode”:

To exit design mode, repeat by pressing the gear icon and selecting “Toggle form design mode”.
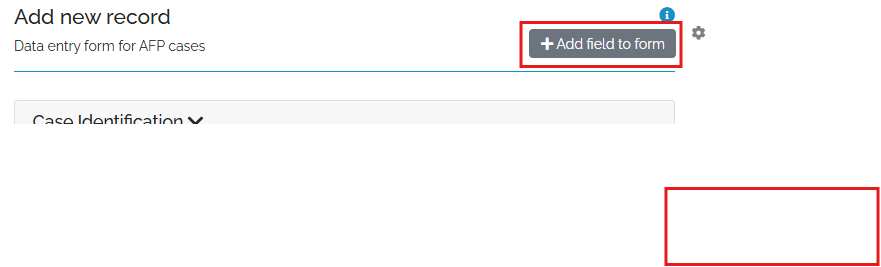
Using design mode
Once in design mode, you can add new formfields, edit the defition of form fields, or remove form fields from the form.
To add a new field to the form press “Add field to form”. Note that the field must be present in the underlying table of the form. Currently, it is not possible to add form fields which are not already fields in the underlying table.
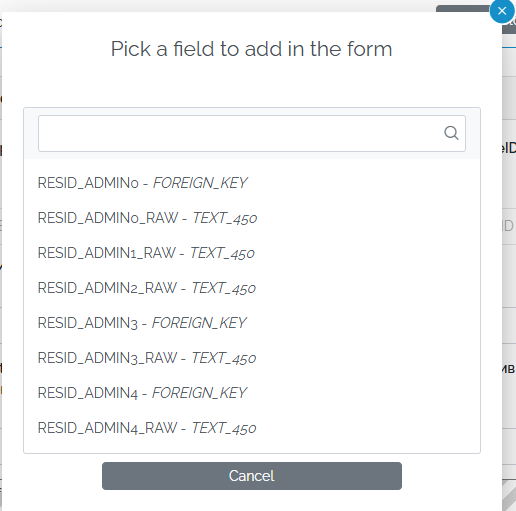
Choose a field from the list. This is the list of fields in the underlying table which are not already in the form.
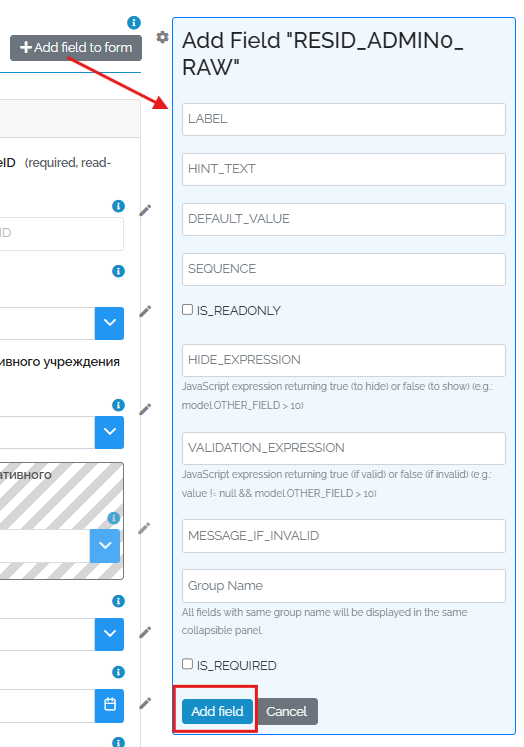
Fill out the properties of the form field and press “Add field”.
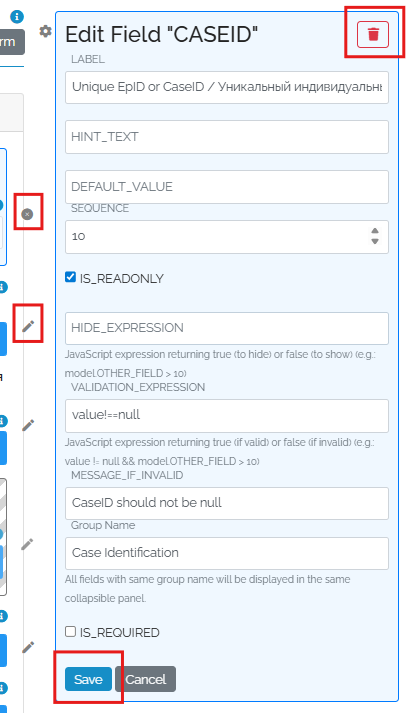
To edit the definition of an existing form field, press the pencil icon next to the field, edit its properties, and press the “Save” button. To stop editing a form field, press the small “x” icon.
To remove a form field from the form, press the trashcan button of the field definition.
Create/Edit Forms - Excel Template
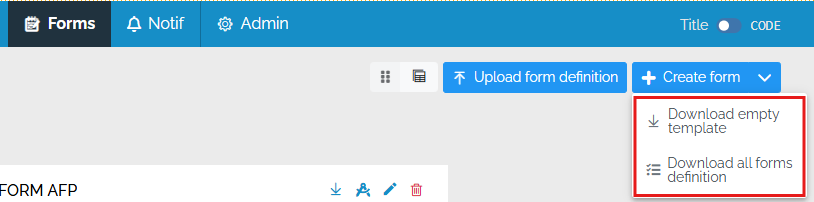
To create or edit a form using an Excel template, click the down arrow at the right of the Create Form button and choose either “Download empty template” or “Download all forms defintions”:
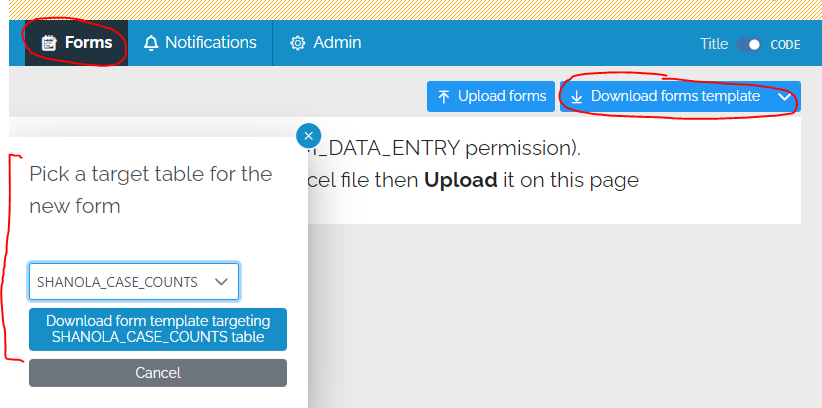
If you choose “Download empty template”, the system asks for the target table of the new form
The template has 2 worksheets, “Forms” and “Form Fields”.
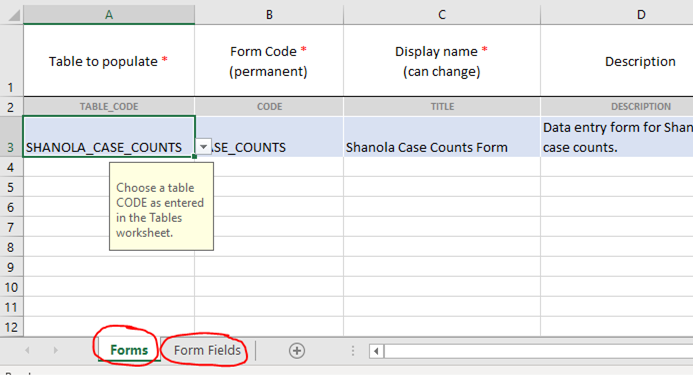
On the Forms worksheet, enter information about the form itself. The “Table to populate” column must refer to an existing table in the data model. On the Form Fields worksheet, enter the fields that should appear on the form.
The Simplest Form - a list of fields
The simplest custom form is simply a list of table field codes.
No other information is mandatory because the underlying data model provides the needed information (by default).
The following image shows very simple but valid form with 4 fields. CASE_COUNTS is the form code and the FIELD_CODE column contains the list of target table field codes
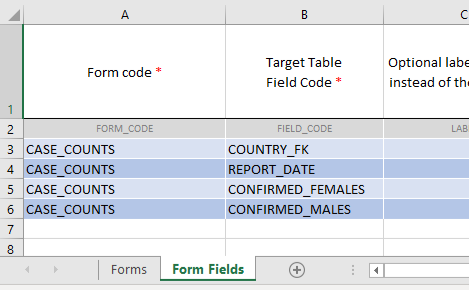
When the form is displayed, because Country is a foreign key field, it is displayed as a dropdown list of countries. By default, the values shown in the dropdown come from the field in the related country table that is marked as “row title” (but values from a different field can be specified, see below).
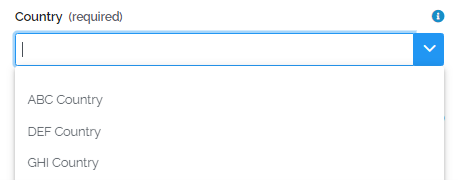
Because Report Date is a date field, a date picker is displayed. Integer fields only accept integers, the max text length of underlying fields is enforced, and so on.
Form Definition Details
| Form Property Code |
Form Property Title |
Note |
|---|---|---|
| CODE | Form code * (permanent) |
Required |
| TABLE_CODE | Code of table to populate * | Required |
| TITLE | Display name (can change) |
Required |
| DESCRIPTION | Description shown on Forms page | Optional |
| WELCOME_TEXT | Welcome text shown at top of the form | Optional |
| NEW_BTN_TEXT | Text to display in the Create button of the form. Defaults to “Add new record” | Optional |
| RECORD_TEXT | Entity text to display to edit/view in the UI. Defaults to “record” | Optional |
| MULTIPLE_INSERTS | Set to true/Y to display a “Save and New” button | Optional |
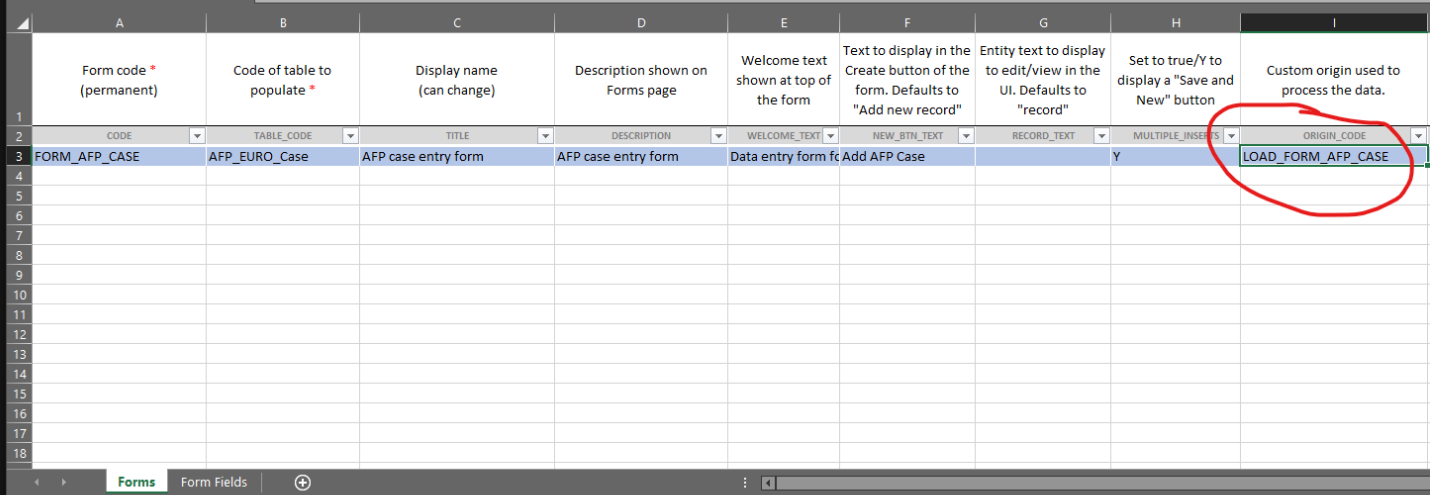
| ORIGIN_CODE | Custom origin used to process the data. | Optional |
Field Definition Details
| Form Field Property Code |
Form Field Property Title |
Note | Example |
|---|---|---|---|
| FORM_CODE | Form code | Required | |
| FIELD_CODE | Target table Field Code | Optional (Either Field Code or SubForm Code must be provided) | |
| SUBFORM_CODE | Subform Code Code | Optional (Either Field Code or SubForm Code must be provided) | |
| LABEL | Label to display instead of the table field Title | Optional | |
| HINT_TEXT | Description to display instead of the table field description | Optional | |
| DEFAULT_VALUE | Default value to initialize the input | Optional | |
| SEQUENCE | Sequence of field for display | Optional | |
| IS_READONLY | Is readonly ? | Optional | |
| HIDE_EXPRESSION | Javascript expression to hide the field | Optional | Hide this form field if EPID is not entered: !model.EPID |
| VALIDATION_EXPRESSION | Javascript expression to validate the entered value | Optional | Invalid if not between 0 and the value entered for CASE_COUNT: value >= 0 && value <= model.CASE_COUNT |
| MESSAGE_IF_INVALID | Message to display when a field value is invalid | Optional | Value should be greater than 0 and lower than model.CASE_COUNT |
| GROUP_NAME | Field group | Optional | |
| FK_OPTIONS_FILTER | If field type is FOREIGN_KEY, SQL fragment to filter dropdown options | Optional | Show only EURO countries: WHO_REGION LIKE ‘EURO’ |
| FK_FIELD_TO_DISPLAY | If field type is FOREIGN_KEY, the field in the FK table used for the dropdown items instead of the row title | Optional | |
| FK_FIELD_TO_SORT_BY | If field type is FOREIGN_KEY, the field in the FK table to sort the dropdown items by | Optional |
For more informatipn about SubForms, go to the Using SubForms Article
Process with custom origin
Optionally, it is possible for submitted form data to be processed by a custom pipeline/origin before being committed. This allows modifications to occur after the user presses the Save button and before the data is committed to the database.
To do this, you need to create a pipeline to perform the processing (see below). The form sends data using a zip file to the pipeline so the Extract section should use the GetZip exactly as it is shown below.
   	<GetZip FileNameToExtractPattern="(\w+)\.csv$">
      <GetText OutputTableName="$1" Delimiter=","/>
    </GetZip>
The zip is consisted of a number of csv files corresponding to the total number of tables the parent form and it’s subforms, if any, are targeting. Each csv file is named after the target table. For example there is the parent FORM_A and the subform FORM_B and each form is targeting the following tables TABLE_A and TABLE_B. In this case inside the zip folder there will be the following csv files, TABLE_A.csv, TABLE_B.csv. This information is useful because the name of the csv file will be used as the SourceTable, in the Load section of the pipeline, as you will see below.
Perform the desired transformation in the Transform section of the LoadTable command.
Use ColumnMappings Auto=”true” to automatically map all columns of the form to the target table but add any new/special column mappings.

Once the pipeline is created, enter the origin code (or create a new origin code) into the ORIGIN_CODE column on the Forms worksheet:
Where to locate the origin code:
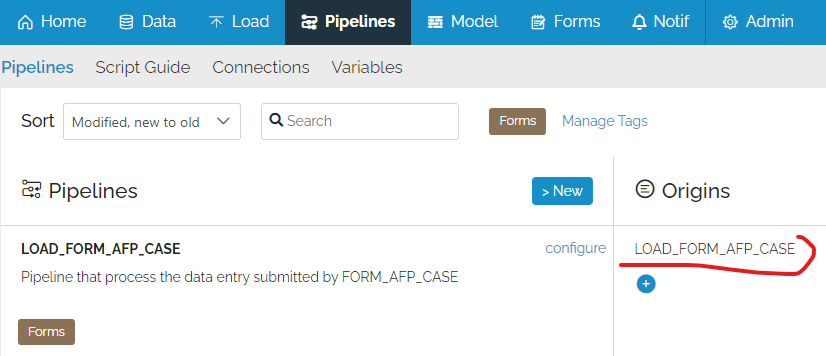
The pipeline will now be executed every time the form is saved.